Showing posts with label microsoft excel tutorial. Show all posts

Saturday, August 1, 2009

Step By Step For How To Protect Worksheet And Cells In Microsoft In Excel 2007

To prevent a user from accidentally or deliberately changing, moving, or deleting important data, you can protect certain worksheet in Microsoft Excel with password. Some new users in Excel sometime still confuse for how to protect sheets and cells. Follow step by step below for how to protect sheets and cells in Excel.

For Example: You want your user only can fill/ type text in the yellow background cells (cannot type outside yellow beck ground cells).

microsoft excel 97

1. Select the cells that you want to protect (the yellow background cells).
Computer Tips: Hold down CTRL key on your keyboard if you want to select another cell

2. On the Home tab, in the Cells group, click Format, and then click Format Cells

microsoft excel tips

3. On the Protection tab, clear the Locked check box, and then click OK.

microsoft excel tutorial

4. On the Review tab, in the Changes group, click Protect Sheet.

microsoft exel

5. In the Password to unprotect sheet box, type a password for the sheet, click OK, and then retype the password to confirm it.

microsoft excel tips and trick

6. Done

If you want to Remove the protection, simply, On the Review tab, in the Changes group, click Unprotect Sheet and type your Password.

Related Topics:
How to configure Word, Excel 2007 options to save file into 97-2003 format?
How to Paste your data from Notepad to the Excel Columns
How to change Text color in the cell that contains negative numbers in Excel 2007
Step By Step For How To Protect Worksheet And Cells In Microsoft In Excel 2007
How to find Duplicate entries in Microsoft Excel 2007
Easy tips to delete blank rows in Excel
Easy tips to create graphic in Excel
Microsoft Excel 2007: How to take limit value to the cell

Friday, June 5, 2009

How to find Duplicate entries in Microsoft Excel 2007

Microsoft Excel Tips

In the previous article I wrote about How To Remove Duplicates Data In Microsoft Excel, using that tips you can remove duplicate data without knowing specific data that you removed. How about if you want to identify duplicates data which is may exist in excel file before you remove?

You can use Excel's Conditional Formatting tool to highlight duplicate entries in a list. Follow the step below:

1. For example you have data such us below:

microsoft excel 97

2. On the Home tab, select Conditional Formatting -> Highlight Cells Rules -> Duplicate Values

microsoft exel

microsoft excel tutorial

3. Click Ok, then you will see duplicate entries in your excel file

microsoft excel tips


If you want to clear the highlight cells, go to Conditional Formatting -> Clear Rules-> Clear Rules from Entire Sheet

microsoft office tips

Related Topics:
How to configure Word, Excel 2007 options to save file into 97-2003 format?
How to Hide and Protect Pattern / Formula in Microsoft Excel 2007
How to Paste your data from Notepad to the Excel Columns
How to change Text color in the cell that contains negative numbers in Excel 2007
How to find Duplicate entries in Microsoft Excel 2007
Easy tips to delete blank rows in Excel
Easy tips to create graphic in Excel
Microsoft Excel 2007: How to take limit value to the cell

Saturday, April 25, 2009

How To Remove Duplicates Data In Microsoft Excel

Microsoft Excel Tutorial

Checking a lot of duplicate data in excel is a hard job. It is easy check one by one data if the data only 10 or 20 rows, how about if you have more than 1000 data?

microsoft excel tutorial

In Microsoft Excel You can specify which column should be checked for duplicate information.

By following these tips below you can easy to find and delete duplicate data in Excel.

1. Open your Excel data then Select the range of cells, or make sure that the active cell is in a table.
2. On the Data tab, in the Data Tools group, click Remove Duplicates.

microsoft excel tips

3. A message is displayed indicating how many duplicate values were removed and how many unique values remain, or if no duplicate values were removed.

microsoft excel 97

Related Topics:
How to Repair corrupted files in Microsoft Excel 2007
How to Paste your data from Notepad to the Excel Columns
How to change Text color in the cell that contains negative numbers in Excel 2007
How To Remove Duplicates Data In Microsoft Excel
Easy Tips To Add Date And Time In Microsoft Excel
How to separate the cell contents in Microsoft Excel

Sunday, April 5, 2009

Easy Tips To Add Date And Time In Microsoft Excel

Microsoft Excel Tips

When you working in Excel sometime you need to follow some steps to create Date and Time. But do you know there is an easy step to create Date and Time using Shortcut Key?

Open Your Excel Program and Try the shortcut key Below

Date : Press Ctrl + ; (Ctrl and ; )
Time: Press Ctrl +Shift + ;

Related Topics:
How to Repair corrupted files in Microsoft Excel 2007
How to Paste your data from Notepad to the Excel Columns
How to change Text color in the cell that contains negative numbers in Excel 2007
Easy Tips To Add Date And Time In Microsoft Excel
How to separate the cell contents in Microsoft Excel

Monday, March 16, 2009

How to Change Upper and Lower Text in Excel

Microsoft Excel Tips

The following tips will show you the easy way to change upper and lower text in Excel:

1. Open Excel program
2. Type GoKHiel In cell A1
3. Type =Lower(A1)In cell B1

4. Press Enter

If you want to change to Upper case type =Upper(A1) in cell B2


If you Want to change the text with the first letter is Capital letter, type =Proper(A1) in cell B3


Related Topics:
How to Hide and Protect Pattern / Formula in Microsoft Excel 2007
How to Change Upper and Lower Text in Excel
How to Repair corrupted files in Microsoft Excel 2007
How to Paste your data from Notepad to the Excel Columns
How to change Text color in the cell that contains negative numbers in Excel 2007
How to separate the cell contents in Microsoft Excel
Microsoft Excel 2007: How to take limit value to the cell

Tuesday, February 24, 2009

Easy tips to delete blank rows in Excel

Microsoft Excel Tips

When we create data in Excel, sometimes there is a blank rows between the data that we created. With this below tips you can delete blank lines quickly.

For example we have data with blank rows data:


Follow the steps below:

1. Sort the range A2: B21 and press F5 on the keyboard, it will appear Go To dialog box, Then Click Special.. Button


2. In new Form Tickmark Blanks then click OK


3. Then, in Home Tab, Click Delete


Now you have data without Blank Rows


Easy right..:)


Related Topics:
How to configure Word, Excel 2007 options to save file into 97-2003 format?
How to Hide and Protect Pattern / Formula in Microsoft Excel 2007
How to Paste your data from Notepad to the Excel Columns
How to change Text color in the cell that contains negative numbers in Excel 2007
Easy tips to delete blank rows in Excel
Easy tips to create graphic in Excel
Microsoft Excel 2007: How to take limit value to the cell

Thursday, February 19, 2009

How to separate the cell contents in Microsoft Excel

Microsoft Excel Tips

One day I get questions from my friend, he said “Can I take a some part of word in cell Excel?

For example you have data BP001 and you want to take some part of the expression such as "BP” or" 001 " only
Can we do this in excel?

In the example below, I will separate the words www.gokhiel.com , and I want to take some part of sentence : www, gokhiel and .com only.
Please see the formula and the result from the table below:


To separate the cell contents, we can use the LEFT and RIGHT fnction.
LEFT function will cut and count the sentence from the left.
RIGHT function will cut and count the sentence from the right.

Related Topics:
How to Hide and Protect Pattern / Formula in Microsoft Excel 2007
How to Change Upper and Lower Text in Excel
How to Repair corrupted files in Microsoft Excel 2007
How to Paste your data from Notepad to the Excel Columns
How to change Text color in the cell that contains negative numbers in Excel 2007
How to separate the cell contents in Microsoft Excel
Microsoft Excel 2007: How to take limit value to the cell

Saturday, February 14, 2009

Time Count/Calculation using Excel

Microsoft Excel Tips

A: How old are you?
B: I am 38 years old, 11 months and 28 days
A: Wow!.. how do you know exactly your date of birth count from now?.
B: I am using Excel.. :)

Ok, above conversation just an example, you can easily to calculation time by year, months or day using Datedif function in excel.

You cannot find Datedif function in list of excel function, even this function “hiding” from list function but this function very useful for time calculation.

See the example below:
You’re birth of date is 12/5/1970 and present date is 12/2/2009
Use this function below to know the time by year, month and day :

=DATEDIF(Date1,Date2,Interval)


Another option for interval :
1. “m”= To count date by Month.
2. “d” =to count date by day.
3. “y” = to count date by year
4. “ym” = to count Month without the year
5. “yd” = to count day without year
6. “md” = to count day without year and month

You can try each interval option to more understand how to use it.

Related Topics:
How to Hide and Protect Pattern / Formula in Microsoft Excel 2007
Easy way to copy one cell to a lot of cells in Excel
How to Paste your data from Notepad to the Excel Columns
How to change Text color in the cell that contains negative numbers in Excel 2007
Time Count/Calculation using Excel
Microsoft Excel 2007: How to take limit value to the cell

Saturday, January 17, 2009

How to Repair corrupted files in Microsoft Excel 2007

Microsoft Excel Tips

When you have experience corrupted file in excel, Microsoft Excel provides automatic recovery for a corrupted file by attempting to reopen and simultaneously repair the file.
I write some methods that I usually use when experience with corrupted data in Excel

To manually repair a file
1. On the File menu, click Open.
2. In the Open dialog box, select the file you want to open, and click the arrow next to the Open button.
3. Click Open and Repair, and then choose which method you want to use to recover your workbook.


If you can open the file in Excel
Save the file in SYLK format
Saving the file in SYLK format is typically used to remove printer corruption. If you can open the corrupted Microsoft Excel file, you can "filter" it if you save it in SYLK format, close the file, and then reopen it as follows:
1. On the File menu, click Save As.
2. In the Save as type list, click SYLK (Symbolic Link), and then click Save.


Note: Only the active sheet in the workbook is saved when you use the SYLK file format. Click OK when the message tells you the selected file type does not support workbooks. Click Yes when the message tells you the file may contain features that aren't compatible with the SYLK format.

3. On the File menu, click Close.
4. On the File menu, click Open.
5. Select the .slk file you saved, and click Open.

Note: To see the .slk file, you may need to click All Files in the Files of type list.

6. On the File menu, click Save As.
7. In the Save as type box, click Microsoft Excel Workbook, and then click Save.

Note: Because this format saves only the active worksheet, you must open the corrupted file repeatedly and save each worksheet separately.

If you can't open the file in Excel

Method 1: Set the recalculation option in Excel to manual
1. Start Excel and open a blank workbook if one is not open on the screen.
2. On the Microsot Excel Ribbon click Excel Options


3. Select Formulas in the left hand of the form
4. In the Calculation Options section, click Manual, and then click OK.


5. On the File menu, click Open and try to open the file.

Method 2: Use Hyperlink
1. Start Excel and open a blank workbook
2. Type some word in Excel cell then right click it, select Hyperlink


3. Browse to the corrupted file then Click OK


4. Now try to open the corrupted file using the word link


Related Topics:
How to Hide and Protect Pattern / Formula in Microsoft Excel 2007
How to Repair corrupted files in Microsoft Excel 2007
How to Paste your data from Notepad to the Excel Columns
How to change Text color in the cell that contains negative numbers in Excel 2007
Microsoft Excel 2007: How to take limit value to the cell

Sunday, January 4, 2009

How to Formatting Cells Values in Microsoft Excel 2007

Microsoft Excel Tips

In the previous version Microsoft Excel 2007, we will do formatting cells by right-clicking the selected cell and choosing Format Cells…
The steps above still working in Microsoft Excel 2007, but do you know there is an easy way to format the cells in Excel 2007?, you can save your time from manual steps to format the cells just for one click.

You can format the cells by clicking shortcut in the ribbon
1. Open your Microsoft Excel 2007
2. Click dropdown “General” Box in Home Tab (see the picture below)


3. Now you can select format cells from the list


If you want to format cells using keyboard shortcuts, you can apply the following keyboard shortcuts to format the cells:

Apply Currency format [Ctrl][Shift] $
Apply Percentage format [Ctrl][Shift] %
Apply Date format [Ctrl][Shift] #
Apply Time format [Ctrl][Shift] @
Apply Number format [Ctrl][Shift] !
Apply Exponential number format [Ctrl][Shift] ^

Related Topics :
How to configure Word, Excel 2007 options to save file into 97-2003 format?
Easy way to copy one cell to a lot of cells in Excel
How to set, change or remove password a document, workbook or presentation in Microsoft Office
How to Formatting Cells Values in Microsoft Excel 2007
Minimize the Ribbon for wider work area in Microsoft Office
Customizing a Quick Access Toolbar in Word 2007
How to preview the word documents without opening?
How to Change Saving Default File Location in MS Word 2007
How to Hide and Protect Pattern / Formula in Microsoft Excel 2007

Saturday, January 3, 2009

How to export and save Microsoft office files to the PDF format

Microsoft Excel Tips

You can save files created by many 2007 Microsoft Office system programs in Portable Document Format (PDF), which is a common format for sharing documents.

PDF is a fixed-layout electronic file format that preserves document formatting and enables file sharing. The PDF format ensures that when the file is viewed online or printed, it retains exactly the format that you intended, and that data in the file cannot easily be changed. The PDF format is also useful for documents that will be reproduced by using commercial printing methods.

1. Click the Microsoft Office Button, point to the arrow next to Save As, and then click PDF or XPS.

save to pdf

Note: if you can not find Save as PDF or XPS you need to install Microsoft office add-in, You can download an add-in from here

2. In the File Name list, type or select a name for the document.
In the Save as type list, click PDF.

If you want to open the file immediately after saving it, tick mark the Open file after publishing check box. This check box is available only if you have a PDF reader installed on your computer.

Next to Optimize for, do one of the following, depending on whether file size or print quality is more important to you:
• If the document requires high print quality, click Standard (publishing online and printing).
• If the print quality is less important than file size, click Minimum size (publishing online).

publish to pdf


3. Click Options to set the page range to be printed, to choose whether markup should be printed, and to select the output options. Click OK.

4. Click Publish.

Related Topics :
How to configure Word, Excel 2007 options to save file into 97-2003 format?
Easy way to copy one cell to a lot of cells in Excel
How to export and save Microsoft office files to the PDF format
How to set, change or remove password a document, workbook or presentation in Microsoft Office
Customizing a Quick Access Toolbar in Word 2007
How to preview the word documents without opening?
How to Change Saving Default File Location in MS Word 2007
How to Hide and Protect Pattern / Formula in Microsoft Excel 2007

Sunday, December 14, 2008

How to Change Column to Row in Microsoft Excel

Microsoft Excel Tips

In Microsoft Excel Changing Column to Row is very easy you can change it with simple step.


Follow instruction below to change column to row :
1. Select the cell data and copy
2. Right click to the cell where you want to paste the data
3. Us e Paste special and tick mark transpose


4. Done, now you can see the result


Related Topics:
How to Hide and Protect Pattern / Formula in Microsoft Excel 2007
How to Repair corrupted files in Microsoft Excel 2007
How to Paste your data from Notepad to the Excel Columns
How to change Text color in the cell that contains negative numbers in Excel 2007
How to separate the cell contents in Microsoft Excel
Microsoft Excel 2007: How to take limit value to the cell

Saturday, December 13, 2008

How to Hide and Protect Pattern / Formula in Microsoft Excel 2007

Microsoft Excel Tips

Sometime after we create some pattern in Excel Data, we don’t want other people who open the data will change or modify our data, Because of that we want to hide and protect the data.

Follow the instruction below tips to hide and protect pattern in Excel:
1. For Example we have data in Excel such us below


2. - Press Ctrl + A on the keyboard to select all data
- Right Click then select Format Cell->Protection
- Make sure to Clear Check box Locked and Hidden
- Click Ok


3. Select the data which is we want o hide it
below Example we want to hide data F,A,C in cell (B9:B11)
- Select the data in cell (B9:B11)
- Right Click then select Format Cell->Protection
- Tick mark Check box Locked and Hidden
- Click Ok


4. - Select Cell data (B9:B11)
- In tab Review, Click Protect Sheet
- Type the password
- Click Ok


5. Done, Please see the result below


Related Topics:
How to Hide and Protect Pattern / Formula in Microsoft Excel 2007
How to Paste your data from Notepad to the Excel Columns
How to change Text color in the cell that contains negative numbers in Excel 2007
Time Count/Calculation using Excel
Microsoft Excel 2007: How to take limit value to the cell

Friday, December 5, 2008

How to Paste your data from Notepad to the Excel Columns

Microsoft Excel Tutorial

Generally if you paste data from Notepad to the Excel it will appear only in the cell you selected it. How about if you have some case that you have to get data from excel and you want to paste it in each columns (text appear in first column and some in second and so on).

For example you have data such us below:


And you want the paste result like the sample below:


Ok, Follow the instruction below:

1. Open Microsoft Excel 2007, in the ribbon Menu choose Tab Data-> From Text


2. Click Next


3. In the Data preview, you can add or remove the line it will make separate column in excel
- Add Line -> Click to the Data Preview area
- Remove Line- Double Click the line in the Data Preview area


4. Click Finish


5. Done

Related Topics:
How to configure Word, Excel 2007 options to save file into 97-2003 format?
How to Hide and Protect Pattern / Formula in Microsoft Excel 2007
How to Paste your data from Notepad to the Excel Columns
How to change Text color in the cell that contains negative numbers in Excel 2007
Easy way to copy one cell to a lot of cells in Excel
Easy tips to delete blank rows in Excel
Microsoft Excel 2007: How to take limit value to the cell

Sunday, November 23, 2008

How to change Text color in the cell that contains negative numbers in Excel 2007

Microsoft Excel Tips

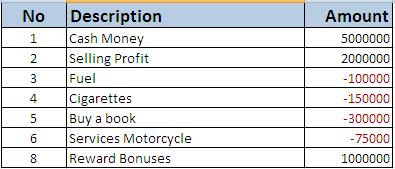
For example, I have the data such as in the Table below:


How to change the value negative numbers in the Amount Column with red color?

Follow the instructions below:
1. Select the data in the Amount column
Click Conditional Formating->Highlight Cell Rules-> Less then..


2. Enter the number “0” in Format cells that are LESS THAN: and select Red Text in the Box


3. Click OK

Now every negative number on the field will be colored red…Easy, right?

Related Topics:
How to Hide and Protect Pattern / Formula in Microsoft Excel 2007
How to Paste your data from Notepad to the Excel Columns
How to change Text color in the cell that contains negative numbers in Excel 2007
Microsoft Excel 2007: How to take limit value to the cell